
Dye Penetrant Test Kit: A Practical Guide to Getting Reliable Results
Liquid penetrant inspection is the oldest non-destructive test still in daily use, and it’s still here for a simple reason: nothing else finds surface-breaking cracks this cheaply, this quickly, or with this little equipment.
No power supply. No calibration block. No certified operator standing by a machine. Three aerosol cans, a clean rag and about fifteen minutes.
But the method is also unforgiving of shortcuts. Every step that gets rushed hides defects rather than revealing them — which is worse than not testing at all, because now you have a passed part with a crack in it.
What a dye penetrant test kit contains
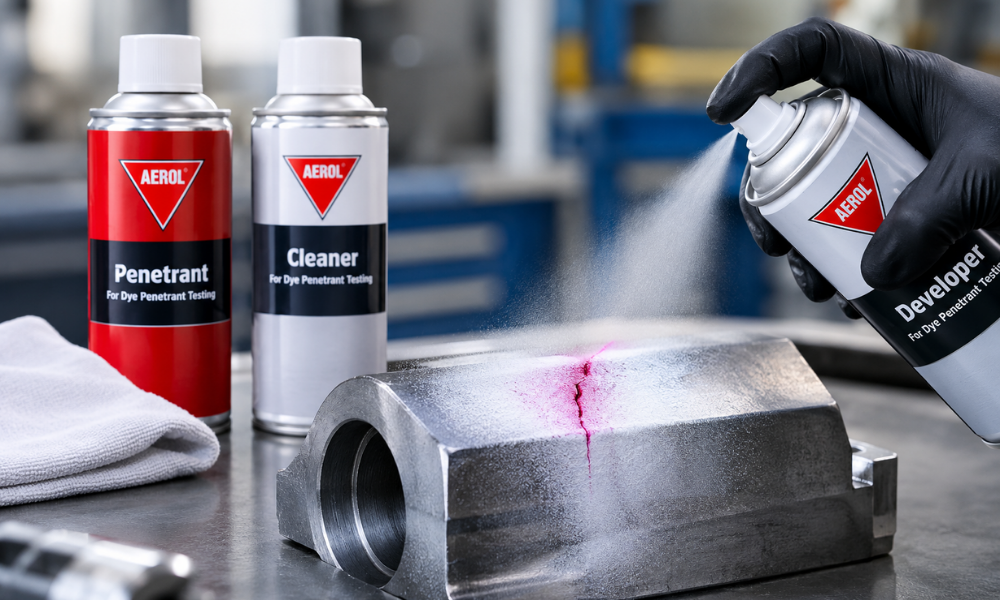
A standard dye penetrant test kit is a three-part system, and each part does one job.
Aerol® Dye Penetrant Test Spray is supplied as exactly this kind of three-can set:
- Cleaner — a powerful, quick-drying solvent that degreases the substrate before testing, and removes excess penetrant afterwards. It gets used twice in the process, at both ends.
- Penetrant — a red dye solution with very low surface tension, which lets it draw into even the tiniest defect or crack by capillary action.
- Developer — a white coating that acts as a blotter, pulling trapped penetrant back out of the defect and providing the contrast that makes it visible.
That contrast is the whole point. Red on white is visible to the naked eye at arm’s length. Red on bare steel is not.
How liquid penetrant inspection works
The physics is capillary action, the same effect that pulls ink up blotting paper.
A crack is a narrow opening. Liquid with low surface tension is drawn into narrow openings and held there. Wipe the surface and the liquid inside the crack stays put, because the surface tension holding it in is stronger than the wiping action removing it.
Then you apply a fine white powder coating. That coating draws the trapped liquid back out by the same capillary effect, and the red dye spreads sideways into the white as it emerges. A crack a few microns wide produces an indication a millimetre wide.
Penetrant testing doesn’t just find defects. It magnifies them into something a human eye can see.
The six-step method
Step 1 — Clean the surface. This is where most tests are won or lost. Oil, grease, paint, scale, rust, water and machining residue all block the defect opening. If the penetrant can’t get in, the crack doesn’t exist as far as your test is concerned.
Spray the cleaner, wipe with a clean lint-free cloth, and let the surface dry completely. Solvent left sitting in a crack will dilute the penetrant and weaken the indication.
Step 2 — Apply the penetrant. Spray an even coat across the inspection area from around 20–30 cm. It doesn’t need to be thick — it needs to be continuous.
Step 3 — Dwell. Now wait. This is the step everyone shortens, and it’s the one that determines whether tight cracks show up at all.
Dwell time depends on the material, the defect type you’re looking for and the temperature. Typical dwell for a general metal inspection runs 10 to 30 minutes. Fine fatigue cracks need longer than gross casting porosity. Cold conditions need longer than warm ones.
Do not let the penetrant dry on the surface during dwell. If it starts drying, apply more.
Step 4 — Remove the excess. The trickiest step to do well. You want the penetrant off the surface and still inside the defect.
Wipe first with a dry, clean cloth to take off the bulk. Then lightly dampen a fresh cloth with cleaner and wipe again in one direction.
Never spray cleaner directly onto the part at this stage. Never flood it. Doing so washes the penetrant straight back out of the crack you’re trying to find, and you get a clean, blank, entirely misleading result.
Step 5 — Apply the developer. Shake it properly — the solids settle hard. Spray a thin, even white film from about 30 cm.
Thin. A heavy developer coat buries the indication under its own thickness. If you can’t faintly see the metal texture through it, you’ve applied too much.
Step 6 — Inspect. Indications start appearing almost immediately, but give it 10 to 30 minutes for a full picture. Watch how they develop, because the shape tells you what you’re looking at:
- A sharp continuous line → a crack
- A broken or intermittent line → a tight crack, or a lap
- Round dots → porosity
- A cluster of dots → gas or shrinkage porosity in a casting
- A large diffuse bleed → a substantial void or a lack of fusion
Photograph indications before cleaning. Once the developer comes off, the evidence is gone.
What this method can and can’t find
Being clear about the limits is what separates a useful test from a false sense of security.
It finds surface-breaking discontinuities of almost any orientation — cracks, laps, seams, cold shuts, porosity, lack of fusion at the surface, and leaks through thin sections. It works on ferrous and non-ferrous metals alike, which is a real advantage over magnetic particle testing on aluminium, stainless steel and copper alloys.
It cannot find anything below the surface. A subsurface void, an internal inclusion, a crack that hasn’t yet broken through — penetrant testing is blind to all of them. For those you need ultrasonic or radiographic inspection.
It struggles with porous materials, where penetrant soaks in everywhere and produces a red mess; painted or coated surfaces, unless the coating is stripped first; and very rough surfaces such as as-cast or heavily corroded finishes, where the background retention creates noise that masks genuine indications.
Where it’s used
Weld inspection is the largest single application — root runs, cap passes and repair welds in fabrication, pressure vessels and structural steelwork. Castings get inspected for surface porosity and cold shuts. Forgings for laps and seams. Machined components for grinding cracks. Aerospace and automotive parts for fatigue cracking during overhaul.
In-service inspection matters as much as manufacturing: pipeline welds, storage tank seams, crane hooks and lifting gear, turbine blades, and any critical component being checked for fatigue after a period in service.
Aerol serves these sectors through its industrial MRO range, across plastics and rubber moulding, automotive, pharmaceuticals, electronics, paints, engineering, fabrication and general manufacturing.
Five mistakes that produce false negatives
- Inadequate cleaning. Contamination in the defect blocks the penetrant. Nothing downstream can compensate for this.
- Short dwell time. Fine cracks need the full duration. Ten minutes of impatience can miss a fatigue crack entirely.
- Over-cleaning at removal. Flooding the part with cleaner is the fastest way to wash a real indication out of existence.
- Heavy developer. A thick white layer conceals what it’s supposed to reveal.
- Inspecting too soon. Tight cracks bleed slowly. Walking away after two minutes means seeing only the obvious defects.
Safety and standards
Penetrant materials are solvent-based. Work in ventilated conditions, wear gloves and eye protection, and keep the products away from ignition sources. Check the safety data sheet for the specific grade you’re using.
For inspections that must satisfy a code, the governing standards are typically ASTM E165 for the general practice and ASME Section V, Article 6 for pressure equipment. Where sulphur and halogen content is restricted — austenitic stainless steel, nickel alloys and titanium — you’ll need certified low-sulphur, low-halogen grades, and the certificate of conformity to go with them.
Aerol manufactures its dye penetrant test kit products under ISO 9001:2015 and ISO 45001:2018 certified quality systems with in-house testing. For grade-specific technical data, batch certification or contamination-limit requirements, request technical specifications.
FAQs
What is a dye penetrant test kit used for?
It’s used to detect surface-breaking defects in metal components — cracks, laps, seams, cold shuts and porosity — without damaging the part. Common applications include weld inspection, casting and forging checks, and in-service fatigue inspection of critical components.
What are the three parts of a dye penetrant kit?
A cleaner, a penetrant and a developer. The cleaner degreases the surface beforehand and removes excess penetrant afterwards, the red penetrant seeps into defects by capillary action, and the white developer draws it back out to create a visible indication.
How long should penetrant dwell on the part?
Typically 10 to 30 minutes, depending on material, expected defect type and temperature. Tight fatigue cracks need longer dwell than open porosity, and cold conditions extend the requirement. The penetrant must not be allowed to dry during dwell.
Can dye penetrant testing find internal defects?
No. The method only detects discontinuities that break through to the surface, because the penetrant has to be able to enter them. Subsurface flaws require ultrasonic or radiographic inspection.
Does dye penetrant testing work on aluminium and stainless steel?
Yes. It works on any non-porous material regardless of whether it’s magnetic, which is a key advantage over magnetic particle inspection on aluminium, austenitic stainless steel and copper alloys.
Why did my penetrant test show nothing?
The most common causes are insufficient surface cleaning, dwell time cut short, or over-cleaning at the removal step — spraying cleaner directly onto the part washes penetrant out of genuine defects. A very heavy developer coat can also bury indications.
What standards cover liquid penetrant inspection?
ASTM E165 covers standard practice for liquid penetrant examination, and ASME Section V, Article 6 applies to pressure equipment. Applications involving stainless steel, nickel alloys or titanium usually require certified low-sulphur and low-halogen grades.